お困りですか?
ご不明な点を解消します
よくあるご質問(FAQ)
Table of Contents
- VRは既にPrismpluseに接続されていますが、コンピュータを検出できないか、ストリーミングを開始できません。
- Oculus Air Linkが接続されてから切断される
- 2.4G WiFiのパスワード入力が正しくありません。Puppis S1でPCVRを使用するにはどうすればよいですか?
- 遅延、カクつき、切断などが発生する
- パソコンのダウンロード速度が遅くなりました。
- 最新のファームウェアを検出できません。ファームウェアをアップグレードできません。
- PCとPuppis S1の接続にUSB-C to USB-Cデータケーブルを使用できますか?PrismXRアプリがPuppis S1を検出できません。
- Puppis S1をインターネットに接続する方法を教えてください。
- Puppis S1 を工場出荷時の設定にリセットする方法を教えてください。
- ソフトウェアのアップグレード方法。
- PCのインターネット共有を有効にできません
- 最適なチャネルを手動で選択する方法。
- 2.4G Wi-Fiのパスワードを間違って入力した場合はどうすればよいですか?
VRは既にPrismpluseに接続されていますが、コンピュータを検出できないか、ストリーミングを開始できません。
1. VDおよびALVRが正常に動作するにもかかわらず、Air LinkがPCを検出できない場合、すべての設定が正しいことを確認してもPCが検出されない場合、根本原因はPCの「ネットワーク検出」が無効になっていることかもしれません。以下の手順で有効にしてください。
- Win + Rでservices.mscを実行します。
- SSDP Discovery、UPnP Device Host、DNS Clientの3つのサービスを見つけて開始し、自動開始に設定します。
- PCのコントロールパネルを開き、「ネットワークと共有センター」を見つけ、「ネットワーク検出を有効にする」を選択します。
- もう一度Air Linkを試してください。
-
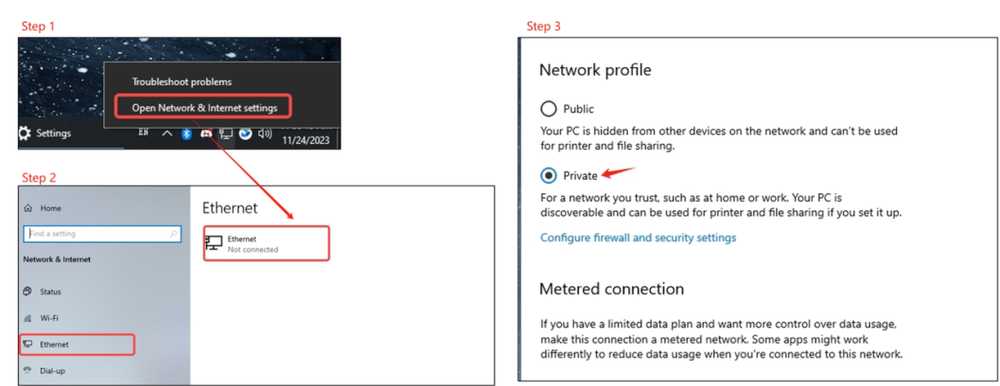
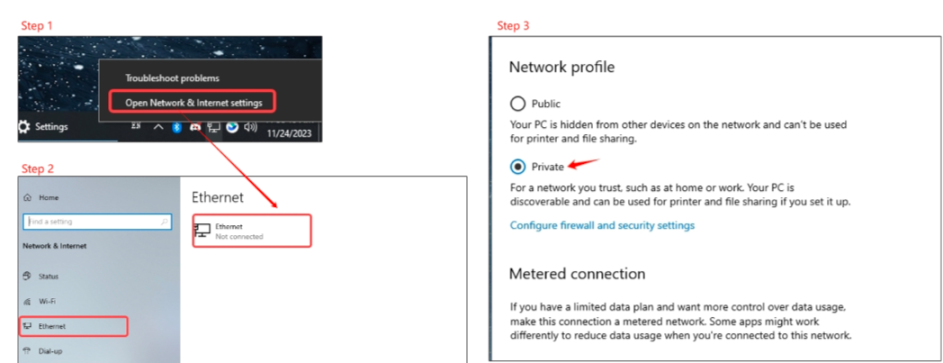
ネットワーク接続をパブリックからプライベートに変更する(Windows 11では、「ネットワークとインターネット > イーサネット > ネットワークプロファイルの種類 > プライベート」にあります)。
-
一部のアンチウイルスソフトウェアがWindows設定よりもこのプロパティを制御する場合があります。アンチウイルスソフトウェアを実行している場合は、その設定に移動し、新しく追加されたネットワークを信頼してください。
-
ファイアウォールまたはアンチウイルスソフトウェアをオフにする
-
Windows 10のコントロールパネル > システムとセキュリティ > Windows Defender ファイアウォール に移動し、詳細設定をクリックします。次に、受信の規則をクリックし、OVRserver_x64.exe Private を下にスクロールします。2つあるはずです。両方について、1つずつ選択し、右クリックしてプロパティを選択し、「接続を許可する」にチェックを入れて、両方についてOKをクリックします。
PCインターネット共有(方法:https://prismxr.net:8000/user/pc/guild/PC_Internet_Sharing_Guide.html)を使用してインターネットに接続し、最新のファームウェア(V1.19)にアップデートしてください。ファームウェアのアップデートが完了したら、アプリを使用して2.4G WiFiに接続するか、PCインターネット共有を継続して使用することができます。Puppis S1は、ストリーミングパフォーマンスを向上させるために特別に再開発されたAX WiFiベースのデバイスです。
Puppis S1のセットアップを支援するために、このビデオをご覧になることをお勧めします: https://www.youtube.com/watch?v=c9JpWRGuesE&list=PL8qdaG_2cXywUnOOJqXVQIdA2-nwu68dI&index=4
セットアップが完了したら、PCVRのために以下の手順に従ってください。
- PCとVRヘッドセットの電源を入れます。
- VRヘッドセットのWi-Fi設定で、「PrismPulse」をネットワークとして選択します。
- VRヘッドセットに応じて、Virtual Desktop(推奨)、Quest Link、Pico Streaming Assistantなど、好みのストリーミング方法を選択します。
- 選択したストリーミング方法に付属の説明書に従って、目的の操作を完了します。
VR体験を向上させるため、問題解決のお手伝いをさせていただきます。この動画がお役に立つでしょう。https://www.youtube.com/watch?v=c9JpWRGuesE&list=PL8qdaG_2cXywUnOOJqXVQIdA2-nwu68dI&index=3この問題を解決するには、以下の方法をお試しください。
- コンピューターが正しく接続されていることを確認してください。
2. ファームウェアを最新バージョンにアップグレードしてください。
ファームウェアが最新バージョンにアップデートされているか確認してください。
3. Puppis S1 のリセット
A.ペーパークリップまたは直径約0.04インチ(1ミリメートル)のその他のアイテムを用意します。
B.Puppis S1 の背面にあるリセットボタン(「Reset」と表示されています)を見つけます。
C. ペーパークリップまたはアイテムを使用してリセットボタンを10秒間押し続けます。Puppis S1 の3つのインジケーターライトすべてが赤く点滅し始めたら、リセットボタンを離します。
D.3つのインジケーターライトが同時に5回赤く点滅し、Puppis S1 が工場出荷時の設定に正常に復元されたことを示します。
注:Puppis S1 の電源が入っていることを確認してください。
4. コンピューターとVRを再起動します
5. Virtual Desktop を使用している場合は、Virtual Desktop の設定を調整してみてください。6) トラブルシューティングのための「Virtual Desktop 設定の調整」については、https://smartglasseshub.com/fix-virtual-desktop-lagging-issues/#google_vignette を参照してください。
6. Airlink を使用している場合は、トラブルシューティングのために以下のリンクを参照してください。https://smartglasseshub.com/oculus-air-link-not-working/
7. ファイアウォール/ウイルス対策を無効にする(一時的に)
8. Nvidia GeForce Experience インゲームオーバーレイを無効にする
Geforce Experience がインストールされているNvidiaグラフィックカードを使用している場合は、インゲームオーバーレイオプションを無効にしてください。これは、Oculus Link と一緒に使用した場合、多数の予期しないラグ、ブラックスクリーン、および切断の問題を引き起こしています。この機能を無効にするには、Geforce Experience を開き、歯車アイコンの「設定」オプションをクリックし、「インゲームオーバーレイ」オプションを無効に切り替えます。
コンピューターには、インターネットに接続できるネットワークカードが2枚搭載されている場合があります。Windowsは2枚のネットワークカードの優先順位を自動的に調整するため、Puppis S1を接続すると、コンピューターはPuppis S1の2.4G WiFiを介してインターネットに接続し、ダウンロード速度が低下する可能性があります。2つの解決策があります。
解決策1:コンピューターでネットワークの優先順位を設定します。コンピューターが接続しているネットワークを優先します。詳細な手順については、https://windowsreport.com/wifi-priority-windows-11/を参照してください。
解決策2:Puppis S1でPCインターネット共有を使用します。この場合、コンピューターは独自のネットワーク接続を使用します。PCインターネット共有の手順については、https://prismxr.net:8000/user/pc/guild/PC_Internet_Sharing_Guide.htmlを参照してください。
Puppis S1がネットワークに接続されていることを確認してください(VRでインターネットにアクセスできるか確認できます)。Puppis S1でネットワークがない原因の1つとして、お使いのコンピューターのファイアウォール設定が考えられます。コンピューターのファイアウォールがPuppis S1へのアクセスを制限していないか確認していただけますでしょうか。さらに、コンピューターのイーサネット設定をプライベートに変更することも試してみてください。
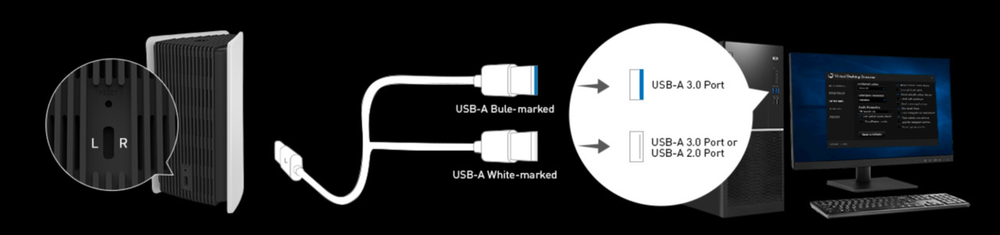
多くのPCにはUSB-Cポートがないことを考慮し、デュアルUSB-A to USB-Cデータケーブルも提供しています。提供されていないUSB-C to USB-C 3.0データケーブルを使用して、PCとPuppis S1を接続することもできます。注:USB-C to USB-Cデータケーブルを使用しているときにPuppis S1の電源が入らない場合は、Puppis側のType-Cコネクタを抜き、180度回転させてから再度差し込んでください。
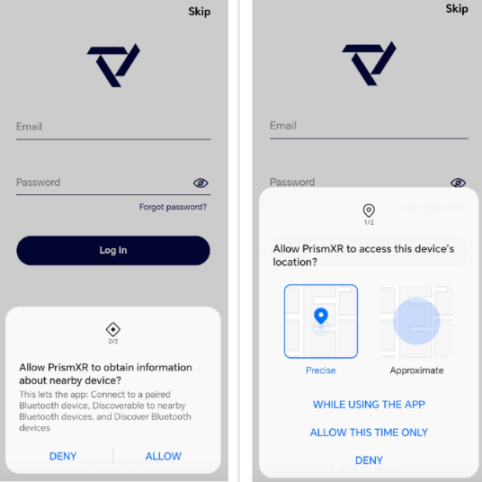
アプリに「位置情報」と「付近のデバイス」のアクセス許可が付与されていることを確認してください。不明な場合は、アプリをアンインストールして再インストールしてください。
- バックグラウンドでPrismXRアプリを終了します。
- 設定ボタンを1回押します。
- 下部のLEDライトが白く点滅します。(3分間点滅し続けます。点滅中は、Puppis S1はペアリングモードで、スマートフォンを探しています。)
- PrismXRアプリを起動します。通常、Puppis S1が追加するようポップアップ表示されます。10秒ほどポップアップ表示されない場合は、右上の「+」をクリックしてPuppis S1を選択してください。
- それでもアプリがPuppisを見つけられない場合は、スマートフォンを再起動して手順4をもう一度試してください。
Puppis S1 をインターネットに接続する方法は、2.4GHz Wi-Fi と PC インターネット共有の 2 つあります。コンピューターがイーサネット経由で接続されている場合、ネットワーク信号はより安定します。
- 2.4G Wi-Fi に接続する:アプリの「インターネット」をクリックし、「Wi-Fi 設定」をクリックして、接続する必要がある 2.4G Wi-Fi を選択します。
- PC インターネット共有を有効または無効にするには、次のリンクを参照してください。https://prismxr.net:8000/user/pc/guild/PC_Internet_Sharing_Guide.html
注:PC インターネット共有と 2.4G Wi-Fi の両方が接続されている場合、PC インターネット共有が優先されます。PC インターネット共有が設定されているにもかかわらずネットワークがない場合、問題は次の原因による可能性があります。Windows の内蔵 DHCP サーバーに問題があり、Puppis S1 に正しいアドレスが割り当てられていません。これにより、Puppis S1 の PS インターネット共有ステータスが無効になり、PC インターネット共有ステータスのままになります。解決策:PC インターネット共有を再設定するには、以下の手順に従ってください。ステップ 1:PC で PC インターネット共有を無効にします。ステップ 2:PC インターネット共有を再度有効にします。Wi-Fi が正常に接続できるようになるまで、上記の手順を数回試すことができます。
Puppis S1を工場出荷時設定にリセットするには、以下の手順に従ってください。
- ペーパークリップ、または直径約0.04インチ(1ミリメートル)のその他のアイテムを用意します。
- Puppis S1の背面にあるリセットボタン(「Reset」と表示)を見つけます。
- ペーパークリップまたはアイテムを使用してリセットボタンを10秒間押し続け、Puppis S1の3つのインジケーターライトがすべて赤く点滅し始めたら、リセットボタンを離します。
- 3つのインジケーターライトが同時に5回赤く点滅し、Puppis S1が工場出荷時設定に正常に復元されたことを示します。
注:Puppis S1の電源が入っていることを確認してください。
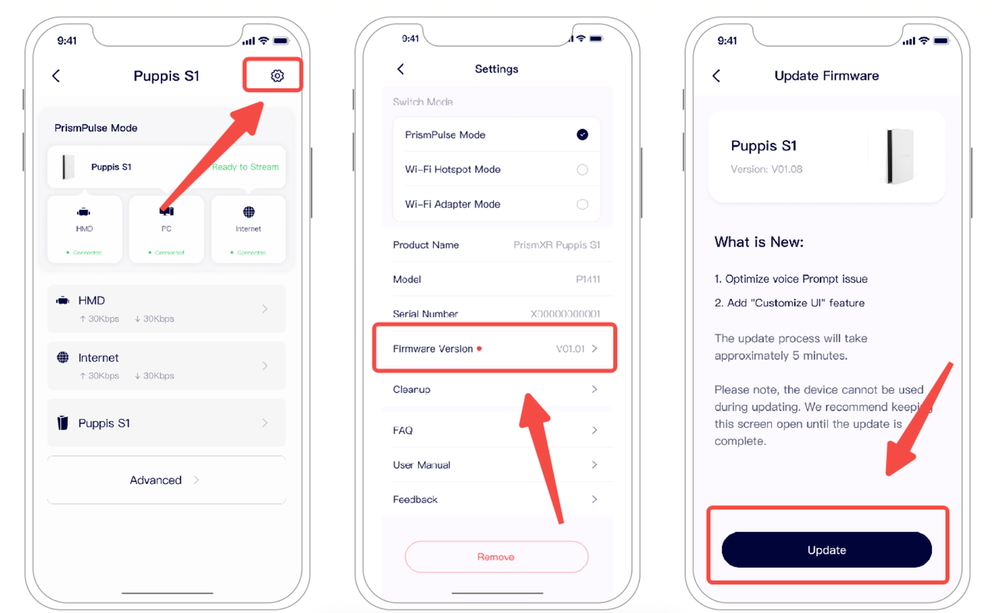
お客様に最高のユーザーエクスペリエンスを提供するため、最新バージョンのファームウェアにアップデートすることを強くお勧めします。
- アプリに「アップデート利用可能」と表示されたら、「ファームウェアをアップデート」をクリックして更新情報を確認します。
- 「インストール」をクリックして、新しいファームウェアをダウンロードしてインストールします。
- Puppis S1 を PC とインターネットの両方に接続したままにしてください。アップデート完了後、Puppis S1 は再起動します。
ファームウェアアップグレードの通知が届いていない場合は、以下の手順に従ってください。
- インターネットに接続します。
- 設定アイコンをクリックします。
- ファームウェアバージョンをクリックします。
- 「アップデート」をクリックします。
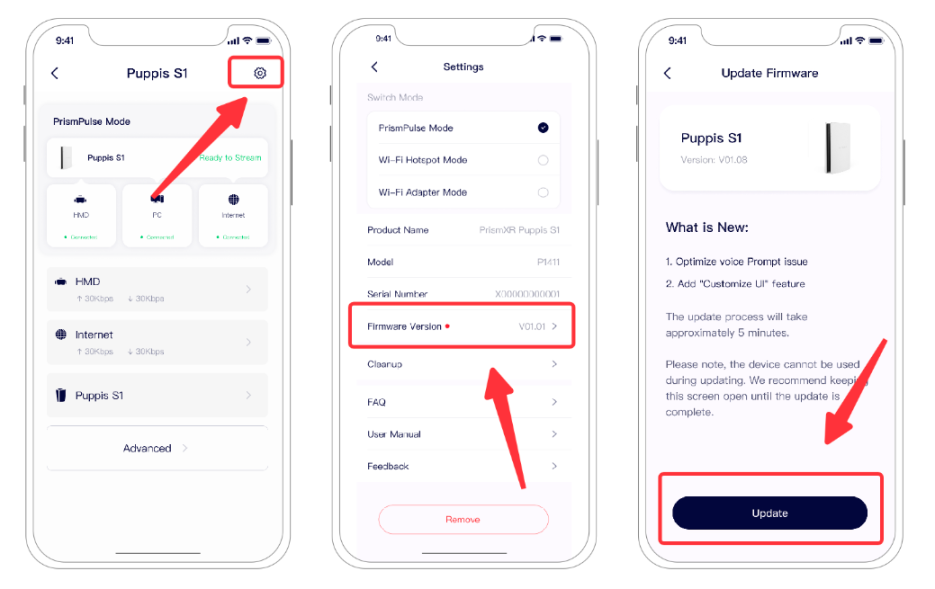
アップグレード中も製品は引き続き使用できます。このページにとどまる必要はありません。アップグレードには約10分かかります。
- 更新処理中、デバイスはアプリから切断され、アプリはデバイスの更新状況を監視できなくなります。
- ファームウェア更新処理が完了すると(成功/失敗にかかわらず)、デバイスは自動的に再起動し、Bluetoothに再接続します。アプリを一度閉じて再度開き、ファームウェア更新が完了したか確認してください。最新のファームウェアバージョンはV1.16です。
アップグレード中も製品は引き続き使用できます。このページにとどまる必要はありません。アップグレードには約10分かかります。
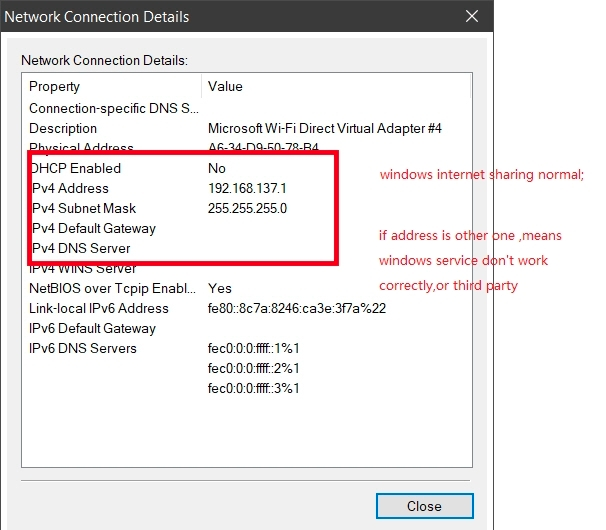
- PCのインターネット共有を有効にした後、PCのネットワーク詳細を確認してください。 a. Windowsをクリックし、「設定」と入力します。「設定」>「ネットワークとインターネット」に進みます。 b. Puppis S1をダブルクリックし、「詳細」を選択します。
正しく機能しているプロパティは以下の通りです。異なる点がある場合は、スクリーンショットをご提供ください。

2. https://drive.google.com/file/d/1KaGs_dudKvQ4cg6bYHU74y1kwe-pVIrU/view?usp=sharing をダウンロードし、管理者として実行してください。これにより、ICS(インターネット接続共有)サービスが有効になり、問題解決に役立つ可能性があります。
3. 上記2つの手順で問題が解決しない場合は、以下の手順に従って「IPv4アドレス」と「IPv4サブネットマスク」を手動で編集してください。 a. 「ネットワーク接続」インターフェースで「Puppis S1」を右クリックし、「プロパティ」を選択します。 b. 「プロパティ」で「インターネットプロトコルバージョン4 (TCP/IPv4)」をクリックします。 c. これら2つのフィールドを次のように手動で編集します。 IPv4アドレス: 192.168.137.1 および IPv4サブネットマスク: 255.255.255.0
インターネット接続の共有を有効にしているときにエラーが発生しました: 現在、インターネット接続の共有は接続「wireless_32768」で有効になっています。次のトラブルシューティング手順を試してください。
- PCのインターネット共有を無効にする。
- デバイスマネージャーを起動するには、[スタート]ボタンを選択し、「デバイスマネージャー」と入力してEnterキーを押します。次に、次の手順を実行します。
a. アンインストールするデバイスの種類を表すネットワークアダプターのノードを展開し、アンインストールするデバイスのエントリを右クリックして、アンインストールを選択します。
b. [デバイスの削除の確認]ダイアログボックスで、[このデバイスのドライバーソフトウェアを削除する]オプションの選択を解除していることを確認します。操作を完了する準備ができたら、[OK]を選択します。 - Puppis S1 USBポートをPCから抜き、差し直します。
アプリをApp Storeから最新バージョン (V1.1.20) にアップデートし、Puppis S1のファームウェアも最新バージョン (≥V1.19) にアップデートされていることを確認してください。
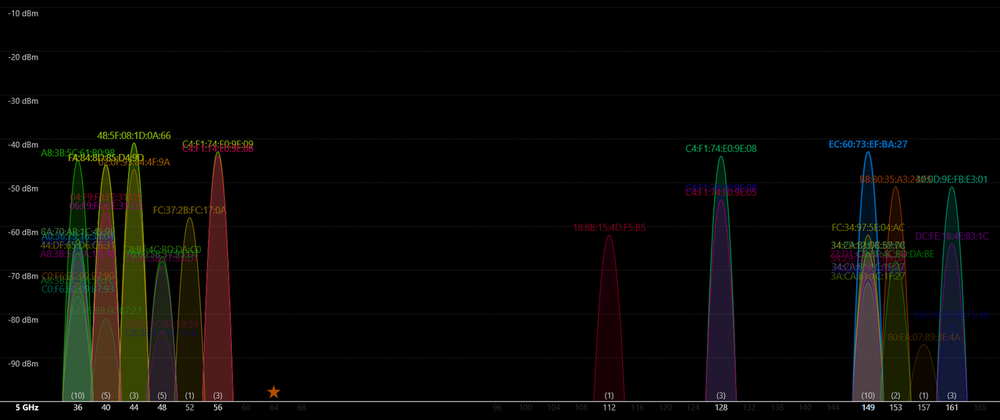
- 方法1:サードパーティ製ソフトウェアツールを使用する
ステップ1:Microsoftアプリストアからサードパーティ製ツールをダウンロードしてインストールします。例:WiFiアナライザー、https://apps.microsoft.com/detail/9NBLGGH33N0N?launch=true&mode=mini&hl=en-us&gl=CNステップ2:周囲のWiFiネットワークが使用しているチャンネルを表示し、手動で固定チャンネルを選択します。
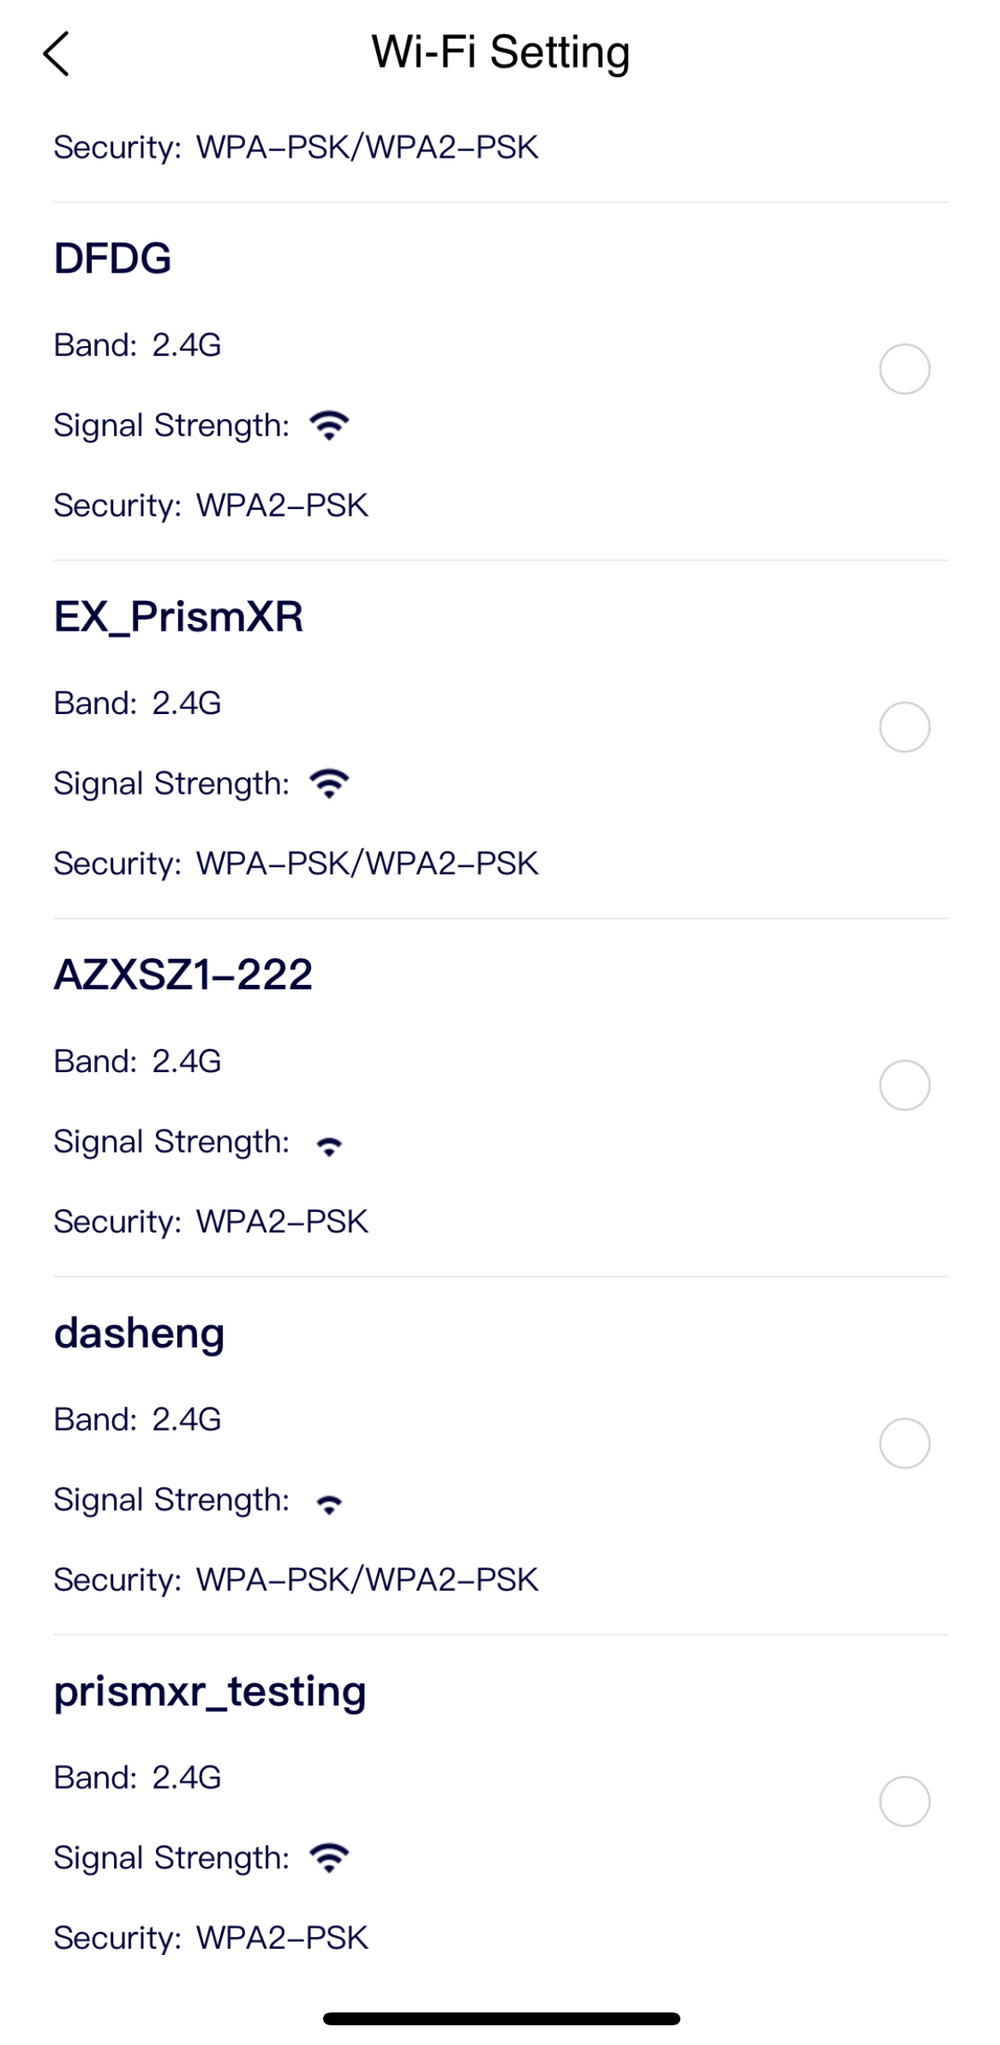
2. 方法2:Puppis S1アダプターモードを使用する
ステップ1:Prismxr APPでPuppis S1をWi-Fiアダプターモードに切り替えます。ステップ2:クリックしてインターネット設定に入ります。
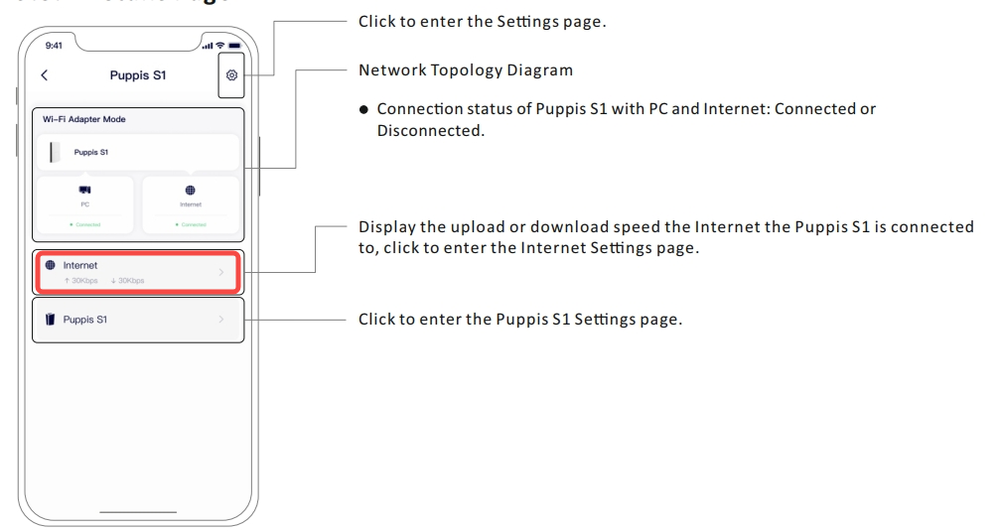
ステップ3:Wi-Fi設定をクリックすると、周囲のWi-Fiネットワークを検索し、利用可能なWi-Fiネットワークのリストが表示されます。このリストから、Wi-Fiが使用しているチャンネルを確認できます。