Looking for help?
Find answers to your questions
Frequently Asked Questions (FAQ)
Table of Contents
- 1. What should I do if I experience lag, stuttering, high latency, or low link rate when streaming PCVR with the Puppis S1 Lite?
- 2. What should I do if Puppis S1 Lite cannot connect to the PC, the internet, or PrismXR Desktop, or if there is no internet access when the WAN is connected?
- 3. Why does my PC’s internet speed slow down after connecting Puppis S1 Lite?
- 4. What should I do if Virtual Desktop says that I possibly have double NAT and I have weird problems with sharing folders from my PC?
- 5. What should I do if the firmware update in the Puppis S1 Lite Settings stays on “Updating” and never finishes?
- 6. What should I do if “Cannot find your PC” is shown on Virtual Desktop (VD) after connecting to the Wi-Fi "PrismPulse" on my HMD?
- 7. What should I do if Virtual Desktop freezes or fails to launch a game after successfully connecting to my PC?
- 8. When Virtual Desktop launches and successfully connects to the PC, the HMD displays the full PC desktop instead of the VR environment. The game appears only on the PC screen, and it does not enter the proper VR 3D space.
- 9. What should I do if Steam Link shows “Cannot find your PC” or is connected to the network but fails to enter Steam Link properly after connecting to PrismPulse?
- 10. What should I do if Steam Link on Quest says I need to be on the same local network, but I'm already connected to Puppis S1 Lite?
- 11. What should I do if Oculus Air Link connects and then disconnects?
- 12. What should I do if Air Link shows "Cannot find your PC"?
- 13. What should I do if Oculus Air Link detects my PC, but shows “connection failed” when I try to connect?
- 14. What should I do if Oculus air link gets stuck on the loading screen after detecting and connecting to the PC?
- 15. What should I do if I can’t find "PrismPulse" in the Wi-Fi list on my Quest?
Please follow the steps below for troubleshooting,
1. Please check your streaming settings
The maximum supported streaming rate of Puppis S1 Lite is 1200 Mbps. Please ensure your streaming software is configured within this limit. Adjust the bitrate in the software settings if necessary, as setting it too high may cause lag or unstable performance. Recommended bitrate settings for different streaming tools are as follows:
1-a. Virtual Desktop:
- Bitrate: 100–200 Mbps
- Codec: HEVC or HEVC 10-bit
- Runtime: VDXR
- Frame rate: 72 FPS
- Bitrate mode: Automatic
1-b. Steam Link: 200 Mbps
1-c. Air Link: 200 Mbps
1-d. Pico Streaming Assistant: 150 Mbps
2. Manually switch the Wi-Fi channel
In congested wireless environments, manually selecting a cleaner Wi-Fi channel can significantly improve streaming stability.
Note: After changing the Wi-Fi channel, Puppis S1 Lite will automatically restart. The restart process takes about 40 seconds, and the new channel will only take effect after the reboot is complete.
2-a. Open your browser and navigate to www.prismxr.com/pages/support-dev.
2-b. Scroll down to "Downloads" and click on "PrismXR Desktop" to download and install it.

2-c. Click on the "PrismXR" shortcut to launch the PrismXR Desktop App.

2-d. Connect your Puppis S1 Lite to the desktop.

2-e. On the Dashboard, go to Estimation, select "5G" in the Band section, and scan for recommended channels.

2-f. Go to Puppis S1 Lite Settings and switch the Wi-Fi channel to a recommended one.

2-g. Click Submit to save the changes and wait for the device to reboot. (If the issue persists, try other recommended channels.)
3. Use "One-Click Scan" for assistance
3-a. Click "Checkup" on the One-Click Scan interface. The scan will check a total of 19 items related to PC VR streaming.

3-b. After the checking is complete, follow the results to fix any issues you encountered using the One-Click button or the help guide. Don't forget to check the recommended items at the bottom of the Result interface as well.


If you encounter issues even after using the “Fix” option in the desktop application, you can try the following steps:
a. Set a Static IP for your PC: Go to the IPv4 adapter settings on your PC and manually set a static IP address.
b. Configure DNS Addresses: Manually input the default DNS addresses for both your personal network adapter and the Puppis device.
4. If the performance of either the RSSI (HMD & Puppis S1 Lite) or the latency (HMD & Puppis S1 Lite) is poor, please check the following:
4-a. Check for any obstructions or interference near the Puppis S1 Lite, such as 2.4G router, metal objects, etc.
4-b. Make sure the Puppis S1 Lite is placed in front of your PC, with the side that has the LED indicators facing you during PCVR streaming.
4-c. Make sure that the distance between the Puppis S1 Lite and the HMD is within 16 feet (5 meters).
5. Power off the device after each use
To ensure a clean and stable network environment for your next session, it is recommended to power off Puppis S1 Lite after use.
5-a. Power off: Press and hold the SET button on the rear of the device for 2 seconds
5-b. Power on next time: Press and hold the SET button again for 2 seconds
Please try the following steps:
1. Make sure Puppis S1 Lite is powered on
The device requires about 1–2 minutes to fully boot after powering on. Please wait until startup is complete before attempting to connect.
2. Check the Ethernet cable connection
Ensure the Ethernet cable is fully inserted into the WAN or LAN port of your device.Push the cable all the way in until you hear a click sound, indicating a secure connection.
3. Check whether the region is set correctly
An incorrect region setting may prevent the device from working properly.
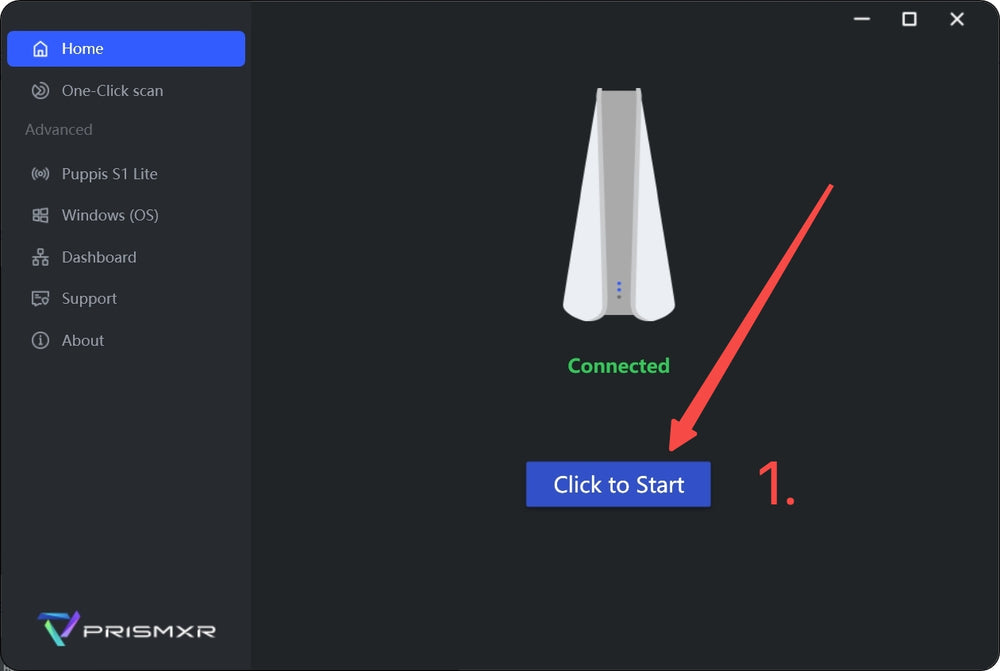
3-a. Open PrismXR Desktop.
3-b. Click “Click to Start” to connect to your Puppis S1 Lite.

3-c. On the Home interface, find the Region setting.
3-d. Set the region to the country or area where you are currently using Puppis S1 Lite.

4. Check whether the Puppis S1 Lite network interface is disabled on Windows
If the Ethernet interface is disabled, the device may not function correctly.
4-a. Go to: Control Panel → Network and Internet → Network and Sharing Center → Change adapter settings
4-b. Locate the Ethernet adapter corresponding to Puppis S1 Lite (usually labeled “Realtek PCIe GbE …”). If the icon is gray or shows Disabled, right-click it and select Enable.
4-c. After enabling, wait a few seconds and refresh PrismXR Desktop.

5. Check the Puppis S1 Lite IP address
5-a. Go to Control Panel → Network and Internet → Network and Sharing Center → Change adapter settings.
5-b. Locate the Ethernet interface labeled for Puppis S1 Lite (usually shows “Realtek PCIe GbE …”).
5-c. Right-click the interface → Status → Details.
5-d. Check the DHCP Enabled and IPv4 Address fields:
- DHCP Enabled should be set to Yes
- The IPv4 Address should be in the 192.168.137.xxx range

If DHCP Enabled shows No, set it to Yes to enable automatic IP assignment. After enabling DHCP, the IP address should be assigned automatically in the 192.168.137.xxx range.
5-e-1. Right-click the Puppis S1 Lite Ethernet adapter and select Properties.

5-e-2. Double-click Internet Protocol Version 4 (TCP/IPv4).
5-e-3. Select "Obtain an IP address automatically", then click OK to save.

6. Try turning off your PC’s firewall
This issue may occur if Windows Firewall is blocking the connection between your PC and Puppis S1 Lite.
6-a. Temporarily disable the firewall (for testing)
6-a-1. Temporarily turn off Windows Defender Firewall
6-a-2. Check whether your HMD can now connect to Puppis S1 Lite. If the connection works after disabling the firewall, it indicates that the firewall is blocking the device.
6-b. Allow TCP Port 10081 in Windows Firewall
After confirming the firewall is the cause, re-enable it and follow the steps below to allow the required port.
6-b-1. Press Win + R, enter wf.msc, then press Enter
(or: Control Panel → System and Security → Windows Defender Firewall → Advanced settings)
6-b-2. Select Inbound Rules
6-b-3. Click New Rule…
6-b-4. Select Port → Click Next
6-b-5. Select TCP, choose Specific local ports, and enter:10081
6-b-6. Select Allow the connection
6-b-7. Select the applicable network profiles (Private / Public / Domain as applicable)
6-b-8. Name the rule (e.g. Allow TCP 10081) and click Finish
7. Restart Puppis S1 Lite
7-a. Press and hold the SET button on the rear of Puppis S1 Lite for 2 seconds to turn it off.
7-b. Wait a few seconds.
7-c. Press and hold the SET button again for 2 seconds to turn it back on.
7-d. Wait for the device to fully boot (about 1–2 minutes).
If Puppis S1 Lite is connected to the internet via 2.4 GHz Wi-Fi, and your PC also accesses the internet through Puppis S1 Lite, the download speed may be slower because the 2.4 GHz band supports lower speeds.
Solution:
1. Whenever possible, connect Puppis S1 Lite to the internet via Ethernet for faster throughput.
2. Adjust your PC’s network priority so it keeps using your own high-speed Wi-Fi or wired internet for downloads, while still maintaining Puppis S1 Lite for PCVR streaming. For detailed steps, please refer to https://windowsreport.com/wifi-priority-windows-11/.
1. Network Discovery and File Sharing:a. Enable network discovery and file sharing on your PC:
a-1. Go to Control Panel > Network and Sharing Center > Advanced sharing settings.
a-2. Turn on network discovery and file sharing for your network profile (private/public).
b. Ensure that the workgroup name is the same on all devices.
2. Firewall Settings:
Check your firewall settings to ensure they are not blocking file sharing. You may need to add exceptions for the file sharing protocols (SMB).
It will take about 5–30 minutes for firmware update, which depends on the speed and stability of the home network connected to Puppis S1 Lite.
During the update, please do not power off or unplug the device.If the status stays on “Updating” for more than 30 minutes without completing, this is most likely a PrismXR Desktop UI bug. We will record this and report it to our development team for optimization.In this case, please follow the steps below to verify whether the firmware update was actually successful:
1. Force quit PrismXR Desktop
- Right-click the PrismXR Desktop icon in the system tray (bottom-right of the taskbar)
- Select Quit / Exit
If the app does not respond:
- Press Ctrl + Shift + Esc to open Task Manager
- Locate PrismXR Desktop under Processes
- Right-click and select End task
2. Reopen PrismXR Desktop
3. In PrismXR Desktop, click Puppis S1 Lite, then Settings
4. Click “Check for Update”
- If it shows "Current firmware is the latest", then the update was successful and the previous “Updating” status was only a display bug.
- If an "Update" is still available, please check the network connection of Puppis S1 Lite and try updating again.
5. If the issue persists after multiple attempts, please contact our support team for further assistance

This issue is usually caused by network or firewall settings. Please try the following steps:
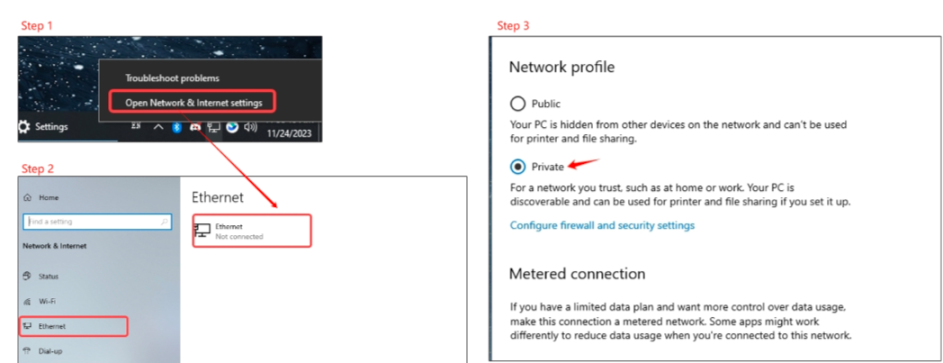
1. Switch your PC’s network profile to “Private” using the PrismXR Desktop App:
1-a. Go to Windows (OS) > Interface.
1-b. Select Puppis S1 Lite from the interface list.
1-c. Change the Network Profile from Public to Private.
2. Disable VPN on both your PC and headset, if enabled.
3. Turn off the Windows Firewall temporarily to test the connection.
4. Make sure both devices are connected to the same network:
4-a. Check the Wi-Fi connection status on your HMD and ensure it is properly connected to “PrismPulse”.
4-b. Verify that the Puppis S1 Lite is properly connected to your PC via the Ethernet LAN cable.
5. Restart VD.
5-a. Press the menu button (Meta logo) on the right controller and select “Quit” to exit VD.
5-b. Reopen Virtual Desktop (VD).
5-c. If it still doesn’t launch successfully, please repeat the steps above.
6. Restart both your PC and headset, then try again.
You can try troubleshooting with the following steps:
1. Disable the game’s launch screen on your PC.
2. Press the menu button (≡) on the left controller to exit the game.
3. If the issue persists, quit Virtual Desktop on both your PC and HMD, then restart it.
You can try troubleshooting with the following steps:
1. Press the menu button (≡) on the left controller to exit Beat Saber.
2. In the VD game menu, select “Half-Life: Alyx” to launch. If it is not available, try launching another game to see if it restores functionality.
3. Press the menu button (≡) on the left controller again to exit the game.
4. Restart Beat Saber.
5. If the above steps do not work, quit Virtual Desktop on both your PC and HMD, then reopen it.
You can try troubleshooting with the following steps:
1. Press the menu button (Meta logo) on the right controller and select “Quit” to exit Steam Link.
2. Quit Steam Link on your PC.
3. Reopen Steam Link on both your PC and HMD.
4. If it still doesn’t launch successfully, please repeat the steps above.
This issue is usually caused by network discovery being blocked by firewall or network settings. Please try the following steps:
1. Turn off the Windows firewall.
2. Change your PC’s network profile from “Public” to “Private”.
3. Check if either your PC or Quest is using a VPN connection, and disable it if so.
If you are using Airlink, please refer to the following link for troubleshooting.
https://smartglasseshub.com/oculus-air-link-not-working/
Additionally, you can try the following steps to resolve the issue.
1. Disable Nvidia GeForce Experience In-game Overlay
If you are using an Nvidia graphics card with Geforce Experience installed, go ahead and disable the in-game overlay option. The has caused numerous unexpected lagging, black screen, and also disconnect issues when used with Oculus Link.
To disable the feature, open Geforce Experience, click on the cogwheel “Settings” option and toggle the “In-game overlay” option to disabled.
2. Force Using Dedicated GPU (Laptop)
If you are a laptop user, your Oculus Air Link issues might be caused by the fact that the system is using the integrated graphics card (GPU) for Oculus processes (instead of the more powerful dedicated GPU).
The Oculus files/processes that we are interested in are the following:
- C:Program FilesOculusSupportoculus-runtimeOVRRedir.exe
- C:Program FilesOculusSupportoculus-runtimeOVRServer_x64.exe
- C:Program FilesOculusSupportoculus-runtimeOVRServiceLauncher.exe
- C:Program FilesOculusSupportoculus-clientOculusClient.exe
To force Windows to use your PC’s dedicated GPU for these Oculus processes:
- Press Windows Key and search for “Graphics Settings“
- Click “Browse” and add all of the above files.
- For each file added, click on “Options“
- Select “High performance” mode from the settings
- Save and restart your laptop
- After restarting, try launching the Oculus Air Link connection again and see if the problems are gone.
3. Turn Everything Off and Back On Again
If you have verified that your PC has enough computing power to run VR games, the next step is very simple: just turn everything off and then back on again.
- Disable Quest Link (Settings → System → Quest Link)
- Restart your PC
- Restart your headset
- Enable Quest Link again
- Launch Air Link Connection
With software, it’s quite often the case that starting from a “blank sheet” helps with a variety of different problems. This is actually my go-to solution whenever I am having trouble connecting to my PC and establishing an Air Link connection.
4. Disable Firewall / Antivirus (Temporarily)
I am going to start with the fact that disabling your firewall and/or antivirus is generally almost never a good idea. That being said, for debugging your Air Link connectivity issues, I am going to ask you to do exactly that (temporarily)
Third-party Antivirus software (for example McAfee, Avast, and others) have been known to often cause issues. For this reason, disable your Firewall as well as Antivirus software and check whether you are now able to establish an Air Link connection.
If you were now successful in your attempt, determine which software was causing the connection problem and re-enable both of them. Use google and try to find a permanent solution (adding exceptions, etc) for your problem where both Antivirus and Firewall remain enabled on your PC!
When adding exceptions, the following applications should be added to the whitelist:
- C:Program FilesOculusSupportoculus-clientOculusClient.exe
- C:Program FilesOculusSupportoculus-runtimeOVRRedir.exe
- C:Program FilesOculusSupportoculus-runtimeOVRServer_x64.exe
- C:Program FilesOculusSupportoculus-runtimeOVRServiceLauncher.exe
Note! Oculus states in their support documentation that port 5669 (TCP) must be open. Make sure your firewall is not blocking it!
If disabling the firewall and antivirus had no effect on your Air Link connection then leave them enabled and proceed to the next steps.
5. Update / Downgrade Graphics Drivers
In 99% of scenarios, you want to have the latest graphics card drivers installed when using Oculus Link. So if you are currently having disconnects when using the Oculus Link connection, make sure that your GPU drivers are up to date.
Do keep in mind, however, that there have been problems both for AMD and NVidia graphics cards with certain driver releases. If you updated your GPU drivers recently and started having problems afterward, it might be a good idea to roll back the drivers to the previous release.
If you can't find your PC using Airlink, please refer to the following guide: https://smartglasseshub.com/oculus-air-link-not-finding-pc/
Additionally, you can try the following steps to resolve the issue.
1. If Virtual Desktop or ALVR works fine, but airlink fails to find PC, ensure all configuration is OK but still not found PC.
The root cause maybe "network discovery" has been disabled on PC.
Follow below steps to open it:
- Win +R run services.msc
- Find and start three services and set to auto start: SSDP Discovery 、UPnP Device Host 、DNS Client
- Open PC 's Control Panel,found “Network Sharing Center” , then "Enable network discovery"
- Try airlink again
2. Changing the Puppis S1 Lite's network connection from public to private (on Windows 11, it's located on "Network & internet > Ethernet > Network profile type > Private".)
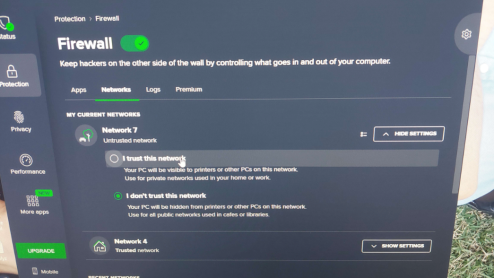
3. Please note, some antivirus software might take over and control this property on the top of windows settings. If you are running antivirus software, please go to its settings and trust the newly added network.
4. On window 10 Control Panel > System and Security > Window Defender Firewall then click on Advanced settings the click on Inbound Rules - scroll down OVRserver_x64.exe Private there should be 2 of them - on both select one at time then right click then select Properties and check Allow the connection then click ok for both
5. Turn off Firewalls or antivirus Software
You can try troubleshooting with the following steps:
1. Close Meta Quest Link on your PC.
2. Press “←” to exit Air Link on your HMD.
3. Go to Wi-Fi Settings on your HMD, turn off Wi-Fi and then turn it back on.
4. Open Meta Quest Link on the PC.
5. Restart Air Link on your HMD, and try connecting.
6. If you still cannot connect to your PC, repeat the above steps.
You can try troubleshooting with the following steps:
1. Close Meta Quest Link on your PC.
2. Press the menu button (Meta logo) on the right controller and select “Quit” to exit Air Link.
3. Restart Meta Quest Link on your PC.
4. Restart Air Link on the headset and try connecting.
5. If you still cannot enter Air Link, repeat the above steps.
Additionally, waiting patiently for 5–10 minutes may allow it to enter normally in some cases.
1. Make sure the Puppis S1 Lite is powered on, it takes about 1–2 minutes to complete startup.
2. Check if any device is already connected to the Wi-Fi using the PrismXR Desktop App:
2-a. Open PrismXR Desktop App.
2-b. Click "Click to Start" to connect to your Puppis S1 Lite.
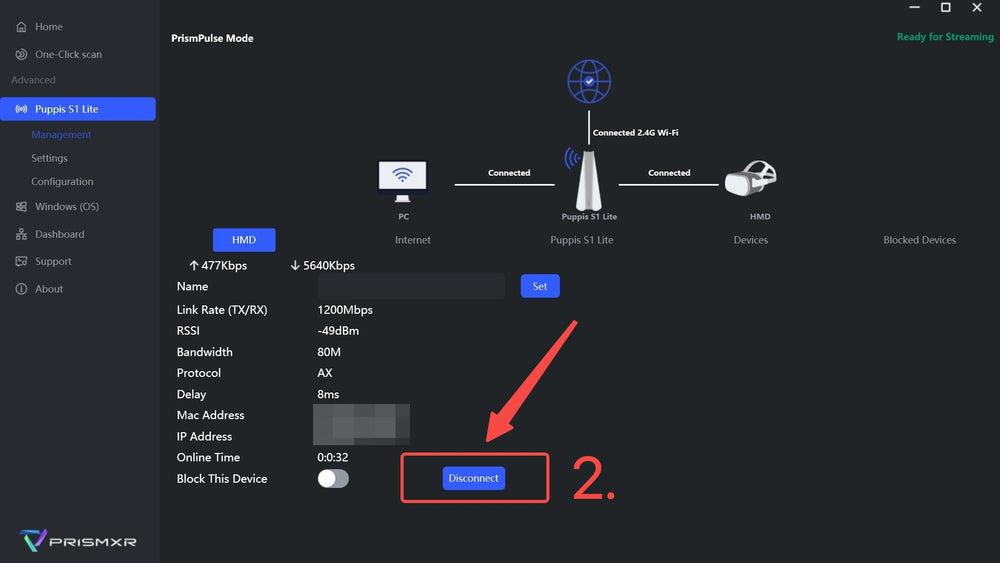
2-c. Go to HMD Settings, path: Puppis S1 Lite >> Management >> HMD
2-d. If HMD Settings shows a device is already connected, click "Disconnect" to disconnect it.
2-e. Put on your HMD again and search for the Wi-Fi network in the list.
3. Check if the region is set to where you are using the Puppis S1 Lite with the PrismXR Desktop App:
3-a. On the "Home" interface.
3-b. Select and change the region to where you are currently using the Puppis S1 Lite.
4. On your Quest, toggle the Wi-Fi switch off and on again to refresh the available networks. (Sometimes Quest requires multiple toggles to detect available Wi-Fi.)
5. If your Quest is already connected to one Puppis S1 Lite and you want to connect a second one, the new device may not appear due to Quest’s Wi-Fi mechanism. You can manually add the network in “Add Network” by entering the SSID and password (SSID and password can be found on the Home interface of PrismXR Desktop).
6. Check with this guide: https://discord.com/channels/1134010214107054160/1254293284940021847